


After drawing different acanthus leaves through the years by simply copying earlier designs, I discovered that there can be a loosely applied mathematical approach to drawing them. The easiest way to understand the details of the design is to begin with drawing a symmetrical leaf. From there you can create more curling, decorative leaves with endless varieties. Once you unlock the mathematical formula, the secrets of the leaf begin to speak.
I encourage you to learn to draw the leaf before carving it. When you eventually put chisel to wood (perhaps while reading my article), you will already understand the subtleties in the details and the flow of the leaf. This specific design is loosely based on the American Rococo bracket on a period fireplace in a 1780s home in Charleston, S.C. But, the symmetrical leaf can be applied to a variety of designs, such as flowing along the surface of a bracket or corbel, repeated leaves around a mirror or picture frame, or one of many leaves around the perimeter of a Corinthian capital.
Here are the parts of a carved acanthus leaf:
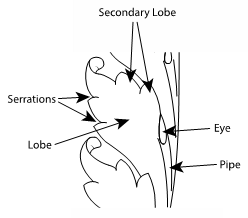 Eye – a teardrop-shaped, deeply carved hole in the leaf that represents the edges of the leaf where the lobes overlap
Pipe – a long, raised section starting from the eye and curving toward the base of the leaf. This should become slightly narrower as it goes down the leaf.
Lobes – overlapping sections of the leaf
Secondary lobes – Smaller sections within each lobe (divided by serrations)
Serrations – Small notches along the outer edges of the leaf
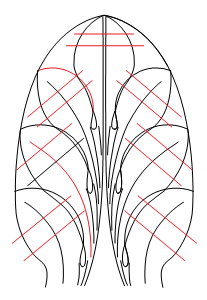
STEP 1 – Locate the eyes
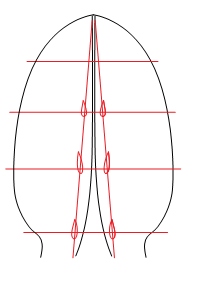
- Draw the outer edge of a basic leaf shape.
- Draw a center vein that gently splays out toward the base of the leaf.
- Draw 2 vertical lines starting at the leaf tip and angling out slightly as they reach the base of the leaf.
- Draw 4 horizontal lines getting slightly closer together toward the leaf tip.
- Position the eyes where the horizontal lines intersect with the angled vertical lines.
STEP 2 – Draw the lobes’ upper edges
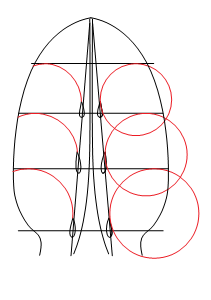
- To help get a correct curvature for these lines, use a compass to draw circles as shown to locate the upper edges of each lobe.
- These can be drawn by hand, but the compass ensures an arc with enough curvature to create the volume needed for each of the lobes.
- Erase the unnecessary parts of the circles, leaving the line defining the upper edges of the lobes.
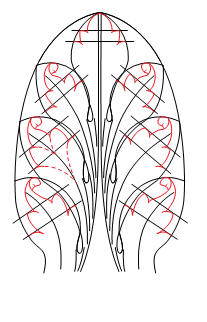
STEP 3 – Draw the lobes’ lower edges, the veins, and the pipes
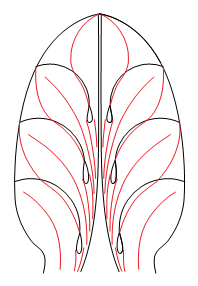
- Draw a line from the end of each eye to the tip of each lobe, defining the lower edge of each lobe. These will be slightly overlapping the upper edge of the lobes drawn in STEP 2.
- Draw center vein lines curving down each lobe.
- Draw two lines that identify the pipes. These should flow down from each eye, starting on either side of it and coming closer together as they flow toward the base of the leaf.
STEP 4 – Locate the lobes’ serrations
- Draw two straight lines approximately perpendicular to the center vein on each lobe. The positions of these lines vary with each design.
STEP 5 – Draw the leaf’s final outline
- This is where the artistic side of your brain will need to step in, as there is more freehand drawing than math.
- Draw each serration on the edge of the leaf based on lines drawn in STEP 4. These should gently curve toward the center vein of their respective lobes. See the dotted lines.
- Finish the details of each lobe as shown by connecting the serrations.
- NOTE: The tips of the leaves curl. It’s necessary to draw the leaf as if it were flat, and then add the twist later.
STEP 6 – Draw the final veins
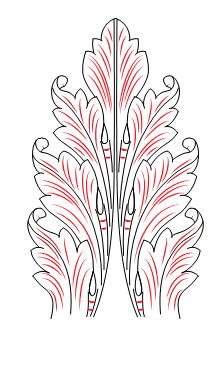
- Draw the remaining center veins on each lobe. These should flow toward the center vein of each respective lobe.
- One of the most important parts of drawing a leaf is making sure all lines flow gently down. Make sure these veins do not overlap or touch.
- Draw two small moon-shaped notches on each of the pipes, giving the illusion of ripples or folds along the leaf. These add more dimension as the eyes now appear to lift, wrinkling the pipe.
Sign up for eletters today and get the latest techniques and how-to from Fine Woodworking, plus special offers.