

I’ve been in this situation many times: I prepare to start resawing and measure the board’s thickness to find out I have just enough material to yield what I need. I typically allow myself 1/8 in. of extra material to joint and plane a resawn board flat. Sometimes there is more than enough thickness; other times I am just under my 1/8-in. goal. When you’ve selected a specific board for your project, you may take the risk of resawing and hoping for the best. Or you might try this technique described in Bruce Hoadley’s Understanding Wood. Used by kiln operators, it indicates the internal stress in wood. He calls these stress sections, while it is more commonly referred to as a prong test.
The original use of this technique was to check for case hardening while drying, but can be translated for use in your shop. Many woodworkers already know how to read grain to anticipate stress or tension, but there are cases where improper drying techniques will affect a seemingly stable board. This simple method will allow you to check for stress along the width of the material you use. It is important to note that this does not indicate any anticipated movement over the length of a board.
Step 1: Slice
Cut a small section off of one end of your board. The results are even better if you’ve cut your board to rough lengths first, and take a section from the middle of the board instead of end grain. The ends of boards are the most exposed to changes in moisture, and is not as indicative of any tension or case-hardening in your material . Taking a section from the middle of the board will reveal actual internal stresses, if there are any. I’ve found a 1/4 in. slice is just enough to get accurate results.
Step 2: Make a fork
With the end grain facing up on the table, waste away the middle of the block, leaving two prongs. The prongs should be about a 1/4 of the thickness of the original material, but no wider than 3/8. This allows enough movement in the prongs to give a more accurate reading.
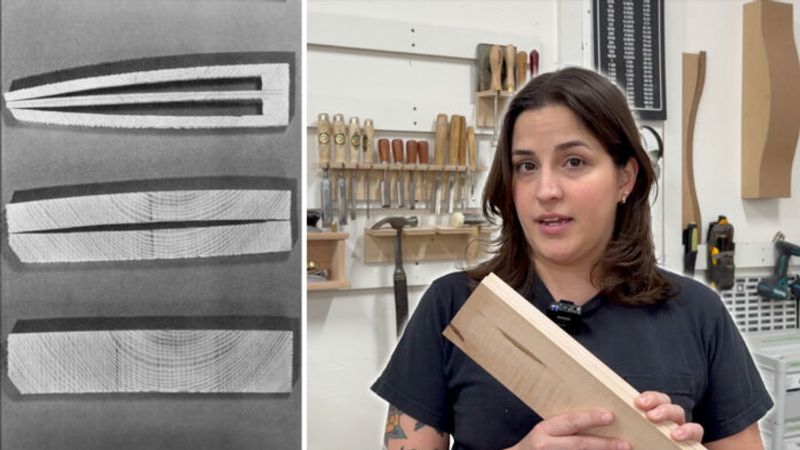
Step 3: Evaluate
What happens to the two prongs? Do they point inward, outward, or stay straight? Straight means the material is stable and able to stay flat when resawn. In this particular case, the prongs did not move, which showed me I could resaw the pieces without any movement issues. It is best practice to let the piece sit for a couple hours before evaluating, as you would let material rest after breaking it into smaller pieces. In or outward may indicate there is stress or tension, and that may mean you will have to resaw the material thicker in order to be able to mill it flat.
Step 4: Resaw
Resaw your material, evaluating your kerf line as you cut with your bandsaw. Any pinching or separating of the material while resawing could indicate stress along the length. This trick will hopefully take some of the guess work out of milling, and allow you to resaw material with confidence.

Sign up for eletters today and get the latest techniques and how-to from Fine Woodworking, plus special offers.